
As we have talked about in previous posts, we really have been trying to update our backyard. We have added a DIY playset with rock wall, new porch and now we wanted to create our own DIY raised planter’s boxes and raised garden beds.
Even though we are not professional gardeners, we knew we could give this outdoor DIY project a shot to help grow our tomatoes, pepper, herbs, and whatever else we want to try our green thumb at.
In our backyard, we wanted a space that was specifically for growing vegetables and herbs. We also knew that the looser dirt in a raised garden bed is supposed to help your plants thrive.
In the past our garden has been on the side of the house. It was really hard to maintain and take care. We thought by adding planter boxes to our backyard then we would be able to work on taking care of our garden, while our kids were playing.
These raised garden beds or boxes also will make it easier on our backs this year. This is a huge plus…
And hopefully that means my husband may actually weed and help take care of things.
*Disclosure: I only recommend products I would use myself and all opinions expressed here are our own. This post may contain affiliate links that at no additional cost to you, I may earn a small commission. Read full privacy policy here. *
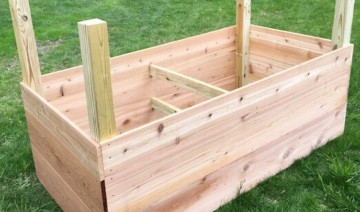
First, you will need to decide the dimensions of your planter boxes. Here will talk about ours that were 7’0” long x 42” wide x 33.75” tall cedar planter boxes.
We chose to use cedar for our outdoor raised vegetable garden beds. Some people will use pressure-treated wood (as explained in this HGTV article), but we wanted our wood to be as natural as possible when dealing with growing vegetables we would be putting in our bodies.
Before we decided we were going to make this a DIY outdoor project, we did look into purchasing raised planters, boxes, and garden beds.Smaller Raised Garden Box on legs: This Amazon best-seller is a great starter planter box that you could fit in multiple places. 4ft Vertical Garden Bed-5 Tiers for Indoor and Outdoor Growing-This gardening item was very intriguing.Unfinished Cedar/Natural Raised Garden from Lowe’s-This would be great if you only wanted a smaller raised garden box. 4 ft. x 8 ft. Original Raised Garden Bed from Home Depot-Depending on the height you want for you raised garden beds, this one might be a good option.20″ x 7″ Wood Box Planter Stand from Target- I love the look of this smaller and modern raised planter. I am not sure if it can go outside, but it sure would look cute in my screened-in porch with herbs in it!
Need more DIY outdoor inspiration? Here are 22 unique and fun planters to add to your backyard.
One thing to note is we built a 3rd garden raised box and tweaked the design a little to add two more posts in the middle. You will see “updated design” throughout this post to include those instructions. Our third box or updated design is 2 ft. longer and we wanted to ensure the stability of the box. We think this is the way to go now for even the smaller boxes (even though ours have held up the past 1.5 years).
1. Cut boards to size. Our posts were 4’ long, long sideboards were 7’ 1.50”, and our short sideboards were 42”.
2. Pre-drill 1 x 12 boards. Attach a clamp to post and cedar board to help keep wood in place while building your raised garden boxes.
3. Screw long sides standing upright. You will need to determine if you want the finished (smoother) side facing out or in. You will repeat this step two times. Our 1 x 12 boards are 3”s above the top of the posts to leave room from the top of the board to the top of the dirt and mulch.
For extra support add a post in the middle of the boxes.
4. Flip screwed boards upside down, on a flat surface with the bottom of posts facing up. Updated design: Add another set of post in the middle of the cedar boards for extra strength.
5. Attach 42” section. Try to make sure the connection is square (we know that is easier said than done)!
6. Flip assembled rectangular garden box right side up with the boards on top.
7. Attach cedar 2x4s inside face splitting board joints in half. This will also allow one person to be able to move the planter boxes.
Updated design: attach the 2 x 4’s to the posts in the middle.
8. Dig four post holes using a manual post hole digger or a shovel. Or if you know you will be doing more outdoor DIY projects, you may want to get an electric post hole digger (one day I may get on for my husband).
This does take some time, but if you build large boxes like we did you will want to do this.
Update design: Dig six post holes for the extra cedar post you added in the middle.
9. Set the planter box in holes. Since we are placing our garden boxes on a slight incline in our backyard it was important that we set the posts so that the box would not tip over. This also will help them stay level.
10. Place 4’ level on top of boxes and level by raising and lowering the boxes in the post holes.
11. Mix and place bagged concrete in or by a wheelbarrow. Follow instructions on the pack of ready mix concrete.
12. Fill holes to set posts in the ground with the mixed concrete to set the post. Make sure to let the concrete cure overnight.
13. Rip extra cedar wood to fill empty spots if your ground is uneven like ours was and attach it to the posts. *****Please note, from comments we have received we believe that people are not doing this step. I am sorry that we did not have a picture up of this until now, but hopefully this will help. You have to create a barrier for the dirt to not come out. The weed barrier alone will not be able to handle the weight of dirt, etc on its own.
Optional: You could figure out how to build some sort of base inside your box to help hold the dirt. We just felt we could rip the wood to fill that empty space and hold the materials inside the box.
When mixing concrete, do not add too much water. It is better to be a little dry than too wet.
Wear gloves when mixing concrete in order to avoid getting concrete burn.
1. Put weed barrier inside of the raised planter boxes.
2. Roll up the inside face 6 inches and staple to the inside of your DIY garden box using a staple gun.
3. Place 11 inches high of materials that promote drainage. We used old bricks in one and landscape pavers and #57 washed river stone.
4. Place 24 inches of topsoil and garden mix soil. Our son sure loved helping with this process. It does take time, but we love doing things ourselves. Depending on the size of your boxes, will depend on how much soil you need.
Tip: We used a local landscape supply company as you need a lot of dirt to fill your planter boxes. Most areas should have a company willing to deliver soil right to your driveway.
5. Place 2 inches of hardwood natural mulch on top of the dirt in your raised garden box.
6. Plant your garden accordingly. We plan on planting tomatoes, green beans, pepper plants and herbs in our raised garden beds. You will have to check back and see how our plants do this year!
You may want to check out this article about companion planting from the Farmer’s Almanac and how to choose what to plant next to each other in your garden boxes.
Or check out this post from DIYDanielle about easy plants to grow outside. If our vegetables don’t do well this year, I may need to revisit this list next year!
Next year we hope to try to start composting and to add another raised garden bed. We will test our green thumbs out this year and see how we can add and improve our garden each year.
Screened-in Porch Ideas (You want to see our amazing new space)
DIY Outdoor Dining Table: What to do with leftover composite decking?
DIY Marbled Pots: Which marbling paint technique is best?
DIY Playhouse Makeover (All Done for FREE!
Article Source: https://thediynuts.com/how-to-...